Monthly Earnings from online photography – February 2026
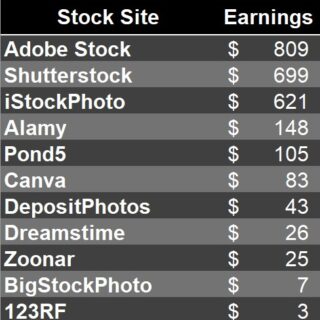
Curious about making money from online photography? See my February 2026 earnings report detailing my $2,994 income across stock agencies and fine art sales.

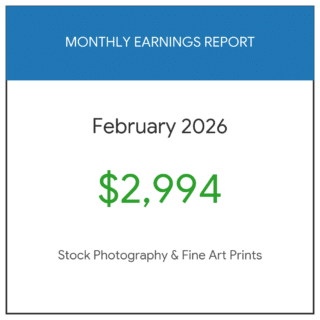
Curious about making money from online photography? See my February 2026 earnings report detailing my $2,994 income across stock agencies and fine art sales.

After 18 months, the sales of my fine art photo prints through my Etsy store have started to take off. How did I manage to achieve these 51 sales in a relatively new shop?

A bit of a detour away from photography with an exploration of several hours of time-wasting advice from CoPilot and Google Gemini and the implications for AI adoption
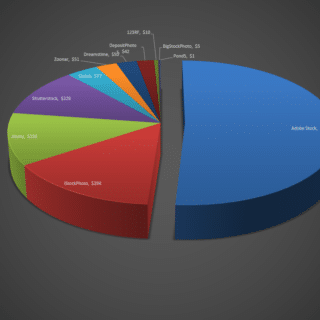
Another monthly earnings report from this professional stock photographer detailing which agencies worked for me in January 2026 and what sort of results you can expect.
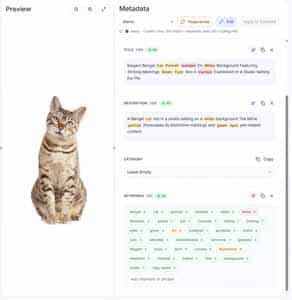
Keywording for stock photography is critical to success but a real pain to do. Can AI keywording apps do this function for you and help you earn real money from photography?
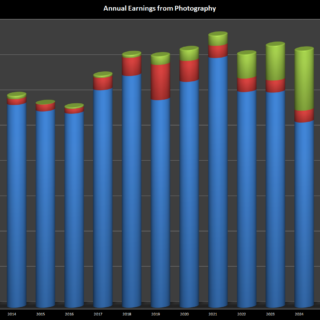
The final report on earnings from online sales of photography in 2025 from this seasoned stock photographer. Sales of prints are making up a larger share of earnings.

Annual review of earnings from selling fine art prints online from this seasoned stock photographer. Another record year ending with over $11000 in sales.
The November 2025 report on earnings from the sale and licensing of photos online at major stock photo agencies and print on demand sites.

The Black Friday sale has started with Jixipix – they are now 50% off. My link is in the blog post.

I enjoy using the Jixipix digital painting apps and create images from my photos that I sell via the various print on demand platforms such as FAA and Pictorem
