
Building a new Photography PC – lessons learned!
After a great set of earnings in August (OK, perhaps that isn’t altogether true…), I decided the time was right to build a new computer for my photography. My current PC was bought refurbished in 2010 and although I added more memory, it was increasingly slow when I wanted to move between the panels in Lightroom and even loading an image for editing seemed to take a few seconds. Frustrating! I saw this article by a fellow photographer Nasim Mansurov about the ultimate PC build for Photographers (and he has various links for the items from B&H if you would like to use them), and that really tempted me to have a go. I followed all his recommendations and so this is more about issues and thoughts I had in building the computer rather than the logic for the choice of the components. I tend to buy all my stuff from Amazon and so I have put various Amazon links in this blog post in case you want to follow in my footsteps.
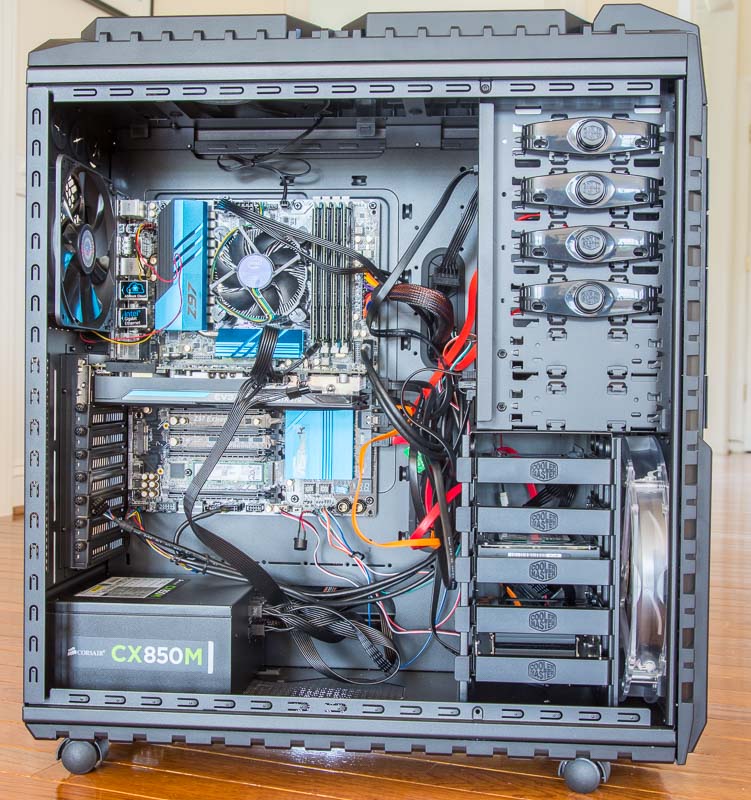
The case I used was a full tower Cooler Master HAF-X. Wow – is this a big unit.
Build of ultra fast photography PC
I must admit I didn’t expect this big a case, but it certainly made things easy to work on within the case. Four large fans (slow moving to minimize noise) gives the cooling power that I needed. My previous rig had about 4 USB attached hard drives that all sat around on the floor gathering dust – on this one I decided to remove the drives from the larger of those USB drives and directly install them in the case. My old PC also had two 250GB SSDs and so I installed those as well as extra fast hard drive space. The end result is that I have the equivalent of six hard drives in this new build. Although the case has a lot going for it, I wasn’t 100% happy. It seemed to me that some of the mounting screws (case sides and also the mounting for the graphics card to the case) were fractionally in the wrong position so that even though knurled bolts were provided, they were just too tight and even with a screwdriver I always felt I was stripping the threads. Everything did fit together but the engineering just didn’t seem up to the price.
Motherboard and CPU
The motherboard is the ASRock Z97 Extreme9. I couldn’t find this on Amazon, but it was on NewEgg at a reasonable price. I had no issues with this – it seemed very well engineered, although just a minor tip – don’t forget to put that little socket panel into place in the case before you install the motherboard in the case. I had the whole thing built and then came across the small metal panel in its plastic bag. Of course, you have to uninstall everything to get it into position! Second tip – I was following the order of the installation from the manual and had my graphics card installed and fastened down by the time I got to the Ultra M.2 SSD installation. What you find there is that the small M.2s install flat against the surface of the motherboard underneath the graphics card. So, yes, that needs to come out again.
For the CPU, I bought the Intel Core i7 – 4790 processor.
Power Supply
The power supply was the Corsair CX series 850 watt. This was well constructed as well, with sockets to allow you to choose which of the various power cables was needed. The motherboard needs the large 24 pin ATX connector but there are also two 8 pin 12V ATX power connectors on the motherboard by the CPU. I struggled for a time to work out how to get two separate power leads to those, but some research on the web informed me that only one is needed. I think the second one could be helpful with extreme overclocking, but not needed normally. There are different sort of Sata power leads as well as the ones for the graphics card and I had no issue powering all my peripherals with this, and the large case allowed it all to be neatly threaded to the back side of the case to minimize cabling inside the main enclosure.
Graphics Card and RAM
I went with the EVGA GeForce GTX 970 as my graphics card. No issues in getting this installed in the slot closest to the CPU or in using it so far.
I splurged on memory with the 32GB Ballistix kit from Crucial. Although Photoshop can happily work on 16GB, in this ultimate build I decided to go for the full amount.
Ultra M.2 Hard Drives
The hard drives were next. Nasim explains that the latest interface technology using this Ultra M.2 technology delivers up to 32 Gb/s – about 5 times faster than SATA drives. In the fastest socket (the one under the graphics card) I used the Samsung SM951 at 512GB. Then in the slightly slower M.2 socket I put a Samsung 850 EVO 500GB card. The strategy that Nasim outlines is to put your operating system and Lightroom catalogs on the C: drive – the Samsung SM951 and then put the raw files that you are working on for the current year on the 500GB second M.2 drive. Once the year is up, you can move those to a slower drive elsewhere in your system and continue editing current images on this really fast drive. I’m only part way through moving my images about, but I can certainly tell you that things happen instantly when you move about in Lightroom from library to develop. Not the slightest lag.
Don’t forget the DVD drive! I did, and had to rush ship one to complete the build. I just chose one a bit at random – the ASUS 24x DVD-RW.
Installing Windows 10
So with everything built I was ready to power on and load the operating system. As this was a completely new build, I couldn’t think of any way to transfer my OEM Windows license from the old PC to the new one, and so I bought a new Windows 10 Home retail license from the Microsoft site. I had downloaded the ISO file and created a DVD, so I was all set. Now for the next set of issues. When I got to the start of the installation, my super fast Samsung 951 was shown as “not available as boot drive”. I also noticed an error code on the motherboard (A6) which references SATA issues. So I dismantled things again and repositioned my Ultra drive in its socket. Same problem. More web searches, some of which talked about having to reformat this drive on another system, which sounded horrendous. I was also recommended to update the BIOS on the motherboard, which I did without any issues. After more searching I came across this site in Australia that simply explained what the issue was. In order to install Windows 10 on these sort of drives, you need to create a bootable UEFI USB drive containing the windows files. There is a small program called Rufus that is used for this, rather than the Microsoft media tool, and this site takes you step by step through that process. I found that Rufus had a tendency to keep changing the “GPT Partition Scheme for UEFI Computer” as you selected the various options, so check that you still have that setting before you start to create the drive. I followed the excellent steps in this article to create this bootable Windows 10 UEFI drive using RUFUS. With this installed in my front panel USB socket, Windows offered to install the files on either of my two M2 drives – the SM951 is the larger of the two in case you don’t know which is which. Windows 10 then speedily installed and I was up and running.
Last Thoughts
I mentioned my two 250GB SSDs earlier from the old computer. I installed these and then combined them into one volume (in effect one logical 500GB disk) using the Disk Management tool in Windows 10. I use this for all my documents and other work related stuff (which are largely in a local copy of a Google Drive account so that they are sync’d continually with my Google Drive). Combining two drives like this means that a failure of either could lose your data, but these are SSDs and the constant backup to the Google Drive gives me peace of mind. I also run a regular incremental backup using OopsBackup which copies changes to files to another internal drive in the case.
Anything else? I did move a 4TB drive from a USB case into my computer but found that it had to be both formatted and then recreated using a GPT partitioning scheme to make the full capacity available. There are some restrictions on partitioning schemes for 2TB and above drives in Windows, but once I found the Windows support article about that, it was easy to fix. Don’t forget to deactivate Creative Cloud before you close down your own PC, and write down all the programs you have as you will never remember them all. The only other program I found that needed deactivation was ColorEyes Display Pro. That is a bit complicated, but there is a PDF in the download files you got with your purchase that explains how to do it.
So far so good – the new machine was expensive (about $1800 I guess), but it is the first proper build I have had in years, and I felt that blowing one month’s earnings from stock photography on it was worthwhile. I do spend most of my days sitting looking at this screen!


Thanks for doing this post Steve. I’m working up to doing a build and this is great encouragement. I would follow right in your tracks but for my need to handle 4K video editing and color grading. Most advice I’ve gotten says this build will run it “probably” but on the low end of good.
Wow – are there more “higher end” builds than this one? That must be a beast!
When I verified my LR, it says no OpenGL support. I am using AMD FirePro M5950 Graphic Card, should I change to use new one that supports OpenGL?
Graphics Processor Info:
Check OpenGL support: Failed
Vendor: ATI Technologies Inc.
Version: 3.3.12458 Core Profile Context FireGL 13.200.0.0
Renderer: AMD FirePro M5950
LanguageVersion: 4.30
Thank you
Hi – I’m not that much of a computer expert! I don’t know if the graphics card drivers are up to date, but the big question is whether the performance in Develop (which I think is the only one to use the GPU) is adequate for your needs. If there isn’t much of a lag when you alter the sliders, then perhaps a new card would not do very much for you? I did notice that your card works with Photoshop CC which does suggest it should work in LR?
Steve