How to backup your Symbiostock photo agency website
This is a specialized post and only of interest to people who have created their own stock agency site using the Symbiostock plugin and WordPress. I’ve written a couple of posts about how I transitioned from the legacy Symbiostock Theme to the new plugin here.
Why Backup: You may have signed up for backup services from your web hosting company, but at the end of the day you will have put 100s of hours into uploading, describing and processing your images on your site. What happens if there is an issue on the server hosting your site and, for some reason, the backup didn’t cover all the necessary files? Much pain!
What to Backup: There are four main areas of the Symbio site:
- The wordpress core installation itself. This is mainly installed in the root of the website and in the wp-includes and wp-admin. You can find out more about the core files and where they are here. You don’t normally need to back these up as you can always download them afresh from the WordPress site.
- The Symbio plugin and Express theme if you used it. These are installed in the wp-content folder and, again, do not really need to be backed up as they are freely available for download again.
- Your images. These are stored in two places – the ss_media folder in the root of your site, and in the wp-content/uploads area of the installation. The original images, renamed into a purely numeric form, are stored in the ss_media folder, the processed thumbnails with the watermark applied are stored in the uploads area in the year and month folders that you normally expect in a WordPress installation. You do need to have a backup of the originals as this represents one big element of your work. The thumbnails in the Upload folder is less critical as the system is able to regenerate those thumbnails if required.
- The Database. Everything that you enter into your site – descriptions, keywords, pricing, users etc. is stored in the database that runs the site. This is critical to the operation and would be impossible to rebuild if it was heavily corrupted, for instance. Hence regular database backups are critical!
Principles to Backing Up:
The largest part of the site (40GB for mine) is the folder containing the original images. To back that up regularly, in its entirety, would take a lot of time and bandwidth and could get you into trouble with your hosting company. I wanted an approach that incrementally backed up this part of the site, so that as I add new images, I don’t have to back up the entire file structure. In a previous site I did this automatically using Mover.io, but in this new site I decided that as I was directly involved in uploading new files, backing up the files manually wasn’t a lot of work. More on how I did that below.
Then I decided to backup the rest of the site using a plugin that would automate it as things like the database change regularly. I found that UpdraftPlus seemed to tick all the boxes and had some good restore tools as well.
Finally, I wanted it to be low cost!
Approach for Image Files: I already had a Google Drive associated with my gmail account – the basic package (which is free) included 15GB of storage. I was already using this to backup work related files from my PC, and so 15GB was not enough as my stock agency grows – so I signed up for 100GB for just $1.99 a month. This will be the core storage location for my backups. I created a dedicated folder for this, so that I don’t need to worry about getting confused with documents sync’d with my PC and these backup files. I could have backed up these files to my hard drive, but I decided not to for a couple of reasons. First, I wanted an offsite backup – I have all my various images files on my PC and associated networked drives and an offsite version of key files would be good. Then, I thought that restoring my site from the high bandwidth Google Drive would be much faster and easier than trying to upload everything from my home internet connection.
- I created a folder in my PC Google Drive folder for these image backups with two folders – ss_media and Uploads. That automatically creates the same folders in your Google drive as these folders are synchronized as they change.
- Using an FTP program (I use FileZilla) I downloaded all my original images into the ss_media folder and then all the folders in the Upload folder in WP-Content into the Upload folder. Although this latter set are not strictly required, they are not big, and also I had got really confused with which images I had uploaded to my site from my core Lightroom catalog. By importing these thumbnails into that Lightroom catalog I can see at a glance which ones have been uploaded as they are now displayed in duplicate sets as more than one version of the file now exists. Not great – but it works to identify the files I still need to upload!
- Google Drive does its thing and I now have both a local backup on my PC and an off-site backup with Google.
- When I upload new images, I can wait until they have all be processed and using FTP, just download the ones with the current date back to my PC. I won’t have to keep the thumbnail folder up to date as I will be clear on my upload status by then!
- Once this is complete, you can move to the next stage – the database and remaining files.
- First connect and authenticate to the Google Drive. This is fully explained in the “Copying your Backup to Remote storage” section of the settings of the plugin, but a word of advice – the simple instructions on the page are not sufficient! Open the full instructions in a new tab on your browser and open the link to the Google API in another new tab. Then follow step by step and you’ll be OK!
- Then set up the settings area like this. You may not have the options to set the backup times if you didn’t buy that add-in, so ignore that. In case you can’t see which files I excluded from the WordPress Core option, these are: wp-admin,wp-includes,ss_media. Choosing to backup WordPress Core makes sure that the small xml files in the core directory get backed up. Important: do not leave any spaces between the folders
- In the wp-content area I excluded upgrade,cache,updraft,backup*,*backups,uploads. Some of these didn’t actually exist and I have found I don’t need to run a caching plugin, but I left them there in case.
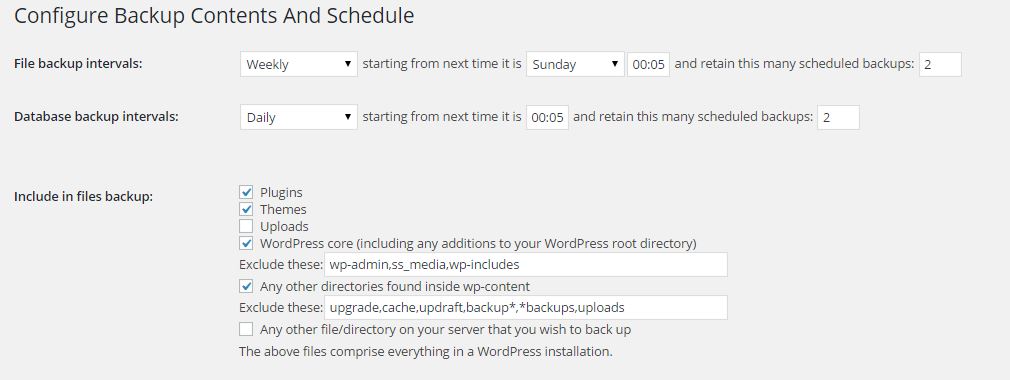
Remember to Save your settings. You can also include an email address to have a completion email sent to you. That should now run and create a database backup every 12 hours and a site backup, excluding the core wordpress files and the image files once a week as nothing much changes of importance there.